当ブログのAMP対応カスタマイズ記事の第3弾です。
よく「この記事が気に入ったらいいね!」というパーツが記事下に出ているのを見かけますね。
これ、実は結構クリックされるんです。特にFacebookページに「いいね!」をいただきやすくなり、SNS上でのリーチを高めるのには効果的です。
しかしWordPressでこのようなパーツを手軽に表示できるVA Social Buzzやこの記事が気に入ったらいいねは、残念ながらAMPページではひしゃげてしまいます。
また当ブログで使っているSimplicityの場合、AMP化するとフォロー系ボタンが出なくなるのが課題でした。
ならAMP対応したパーツを自分で作ってしまえ・・・というのが今回の趣旨です。
何がどうなるのか
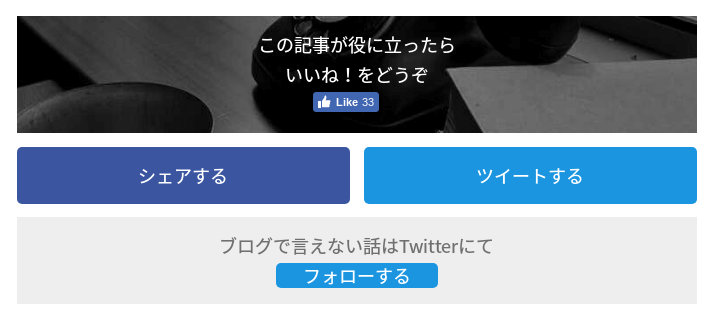
AMP対応した記事ページにおいて、記事下に「この記事が気に入ったらいいね!」を表示します。
仕上がりイメージはこちら。各箇所の文言は自由に設定可能です。
カスタマイズの方法
カスタマイズは3ステップで終わります。
AMP用のFacebook Likeスクリプト
1つ目が、AMPに対応したFacebook Likeスクリプトです。
AMP Projectの公式ドキュメントから取得できます。
これを親テーマのsingle-amp.phpのheadタグの最後にコピペします。
</head>で検索すると挿入箇所が見つけやすいです。
</style>
<!-- ここにコピペ -->
<script async custom-element="amp-facebook-like" src="https://cdn.ampproject.org/v0/amp-facebook-like-0.1.js"></script>
</head>
HTML(PHP)
2つ目はHTML本体(PHP)です。
下記コードを、親テーマのsingle-amp.phpの記事下部分(the_content( get_theme_text_read_more() );の直下)にコピペします。
パーツ内の文言を変えたい場合は、該当部分の日本語を修正してください。
FacebookページのURLとTwitterのスクリーン名を忘れずに入れてください。
<div class="amp-fb-like"> <div class="amp-fb-like-msg">この記事が気に入ったら<br/>いいね!</div> <amp-facebook-like width=90 height=30 layout="fixed" data-layout="button_count" data-href="自分のFacebookページのURL"> </amp-facebook-like> </div> <div class="amp_share"> <div class="amp_share_button amp_share_button-fb"> <a href="https://www.facebook.com/sharer/sharer.php?u=<?php urlencode(the_permalink()); ?>"><span class="amp_share_button_text">シェアする</span></a> </div> <div class="amp_share_button amp_share_button-tw"> <a href="https://twitter.com/share?url=<?php urlencode(the_permalink()); ?>&text=<?php urlencode(the_title()); ?>"><span class="amp_share_button_text">ツイートする</span></a> </div> </div> <div class="amp-tw-follow"> <div class="amp-tw-follow-msg">Twitterを</div> <a class="amp-tw-follow-button" href="https://twitter.com/intent/follow?screen_name=自分のTwitter名">フォローする</a> </div>
CSS
最後にCSSです。
子テーマのamp.cssに下記コードを追加します。
好き画像のURL部分は、ブログのヘッダー画像のURLなどを使うとよいかと思います。
.amp-fb-like {
 text-align:center;
 background-image: url(好きな画像のURL);
 color: white;
 background-size: cover;
 padding: .75em;
 margin: .75em 0;
}
.amp-fb-like::before{
 background-color: rgba(0,0,0,0.5);
 position: absolute;
 top: 0;
 right: 0;
 bottom: 0;
 left: 0;
 content: ' ';
}
.amp-tw-follow-button {
 background-color: #1b95e0;
 padding: 0.2em 1.5em;
 color: white;
 text-decoration: none;
 border-radius: 5px/5px;
}
.amp-tw-follow {
 background-color: #eee;
 color: #707070;
 padding: .75em;
 text-align: center;
}
.amp_share {
 margin-bottom: .75em;
}
.amp_share:after {
 content: " ";
 clear: both;
 display: table;
}
.amp_share_button {
 float: left;
 width: calc(50% - 7px);
 text-align:center;
}
.amp_share_button a {
 border-radius: 5px;
 color: #fff;
 display: block;
 padding: .75em 0;
 text-decoration: none;
}
.amp_share_button-fb {
 padding-left: 0;
 padding-right: 7px;
}
.amp_share_button-tw {
 padding-left: 7px;
 padding-right: 0;
}
.amp_share_button-fb a{
 background-color: #3b55a0;
}
.amp_share_button-tw a {
 background-color: #1b95e0;
}
注意点など
- 親テーマのファイルを編集しますので、テーマをバージョンアップすると編集部分が上書きされます。編集内容は別途保存ください
- 「この記事が気に入ったらいいね!」の背景の暗さを調整したい場合、
.amp-fb-like::beforeのbackground-color:rgba(0,0,0,0.5);の赤字部分の数字を変えてください - カスタマイズ後はAMPエラーが出ないかチェックをお願いします
参考 AMP テスト – Google Search Console
まとめ:「いいね!」を諦めない
以上、AMP化した記事ページでも「この記事が気に入ったらいいね!」を表示するカスタマイズでした。
Simplicity標準のAMPページではフォロー系のボタンが出ず、AMPページ経由でフォローいただくことが難しいのが課題でした。
とはいえ、PVの8割を占める検索経由の読者さんをAMPだからって逃すのはもったいないですよね。
AMP経由でもFacebookページやTwitterをフォローしてほしいな、と思っている方はぜひ参考になさってください。
その他のAMP系カスタマイズはこちらをどうぞ。

https://bloglab.naenote.net/entry/related-content-unit-in-amp


コメント